Sabtu, 14 Februari 2015

Step By Step Konfigurasi Mikrotik HotSpot dengan User Manager (bagian 1)


Berikut ini kita akan melakukan konfigurasi Mikrotik HotSpot dengan mengunakan User Manager dan Radius. Keuntungan mengunakan User Manager adalah kemudahan dalam membuat user Hotspot dalam jumlah banyak dengan waktu yang cepat serta dapat dioptimalkan lagi dengan System Ticket.
Konsep konfigurasi yang akan kita lakukan adalah seperti gambar Layout dibawah ini :
layout_desain_mikrotik_hotspot_warnet_cafe
Kali ini kita akan melakukan konfigurasi dengan data sebagai berikut :
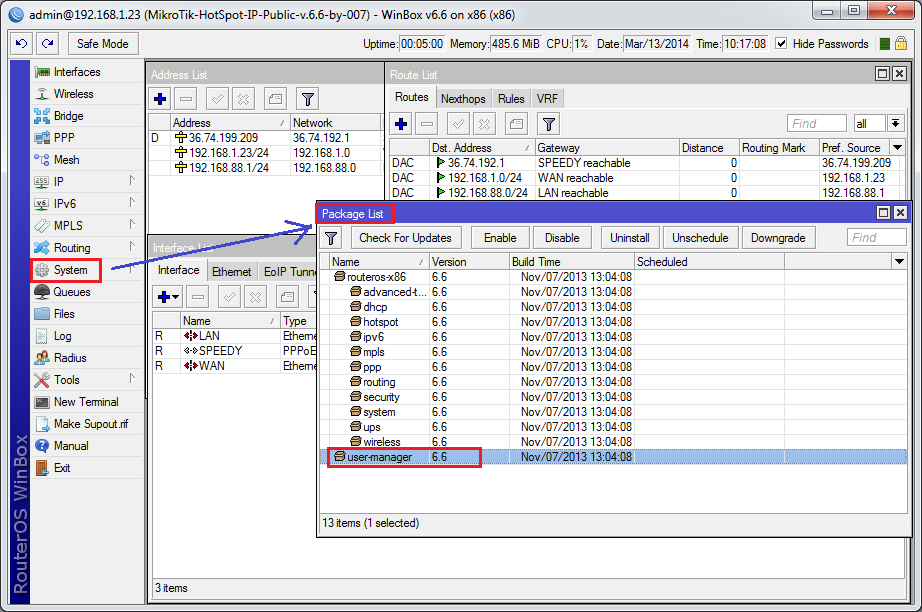
IP Modem ADSL / IP Gateway : 192.168.1.1
IP Mikrotik Interface WAN : 192.168.1.23
IP Mikrotik Interface LAN : 192.168.88.1

1.  Selanjutnya kita konfigurasi pada Mikrotik dengan hasil seperti gambar dibawah ini :
Mikrotik-v.6.6-HotSpot-001
2. Selanjutnya masuk ke menu : IP Hotspot.
Mikrotik-v.6.6-HotSpot-002
3. Lalu kita klik menu HotSpot Setup.
Mikrotik-v.6.6-HotSpot-003
4. Pilih HotSpot Interface : LAN. Lalu klik Next.
Mikrotik-v.6.6-HotSpot-004
5. Selanjutnya pada Local Address of Network kita pilih 192.168.88.1/24 dan checkmark Masquerade Network lalu kita klik Next.
Mikrotik-v.6.6-HotSpot-005
6. Selanjutnya pada Address Pool of Network isikan IP Address Range yang akan kita gunakan untuk Pool IP Addres bagi HotSpot Client. Misalnya range IP address : 192.168.88.100 – 192.168.88.254. Lalu kita klik Next.
Mikrotik-v.6.6-HotSpot-006
7. Selanjutnya pada select certitificate, klik next.
Mikrotik-v.6.6-HotSpot-007
8. Selanjutnya pada IP Address SMTP Server, klik next.
Mikrotik-v.6.6-HotSpot-008
9. Selanjutnya pada DNS Server, masukkan IP DNS-nya Google atau Provider yang kita gunakan. Lalu klik next.
Mikrotik-v.6.6-HotSpot-009
10. Selanjutnya pada DNS Name, klik next.
Mikrotik-v.6.6-HotSpot-010
11. Selanjutnya akan muncul tampilan Setup has completed successfully. Klik OK.
Mikrotik-v.6.6-HotSpot-011
12. Selanjutnya kita perlu rapikan sedikit lagi. Pada menu HotSpot option Servers, double klik lalu rapikan nama hotspot server dan Addres per Mac serta penentuan idle time out-nya.
Mikrotik-v.6.6-HotSpot-012
13. Selanjutnya pada menu Server Profile, rapikan nama Profile serta alokasi bandwith jika perlu.
Mikrotik-v.6.6-HotSpot-014
14. Selanjutnya pada Option User Profile, buatlah profile user. Misalnya User-128-Kbps, User-256-Kbps, User-512-Kbps, dll sesuai kebutuhan kita. Tentukan jumlah share user = 1 serta Rate Limit sesuai nama profile yang telah kita tentukan. Tentukan juga Mac Cookies time out sesuai kebutuhan.
Mikrotik-v.6.6-HotSpot-015
15. Rapikan dengan profile sesuai kebutuhan kita. Bisa mengacu pada bandwith limit ataupun quota base.
Mikrotik-v.6.6-HotSpot-016
16. Selanjutnya kita buat User sesuai profile yang telah kita siapkan.
Mikrotik-v.6.6-HotSpot-017
17. Selanjutnya kita coba koneksi internet dari client. IP Address buat Automatic. Selanjutnya saat kita browsing websites maka akan otomatis muncul Login Page HotSpot seperti gambar dibawah ini. Berarti setting Hotspot kita sudah berfungsi dengan baik. Selanjutnya kita lakukan Login dengan user hotspot yang telah kita buat dan lihat hasilnya.
Mikrotik-v.6.6-HotSpot-018
18. Okey, selanjutnya tampil seperti gambar di bawah ini dan bisa mengakses internet dengan baik.
Mikrotik-v.6.6-HotSpot-019
19. Jika kita pantau pada Mikrotik HotSpot via Winbox akan muncul active user dari PC Client yang sudah konek internet via HotSpot tadi. Okey, mudah sekali bukan? Pada artikel selanjutnya kita akan mengunakan User Manager untuk pembuatan User Authentikasi agar lebih mudah… Selamat mencoba…
Mikrotik-v.6.6-HotSpot-020

Step By Step Konfigurasi Mikrotik HotSpot dengan User Manager (bagian 2)

Keuntungan kita dengan mengunakan User Manager dan Radius Server ini adalah untuk lebih memudahkan kita dalam melakukan Manajemen User HotSpot, baik dalam pembuatan account secara massal ataupun pembuatan Kartu Member HotSpot, pembuatan Profile user, pengaturan bandwith user profile, monitoring user session atau user yang sedang aktif, memantau Log User, pelaporan / accounting / payment, dan lain-lain.

Okey, langsung saja kita mulai :
1. Perhatikan pada Mikrotik Winbox dibawah ini, yang mana kita mengunakan layanan Speedy dan kita gunakan satu Interface LAN untuk broadcast wifi atau jaringan Internet HotSpot.
Mikrotik-v.6.6-HotSpot-with-User-Manager-IP-Public-001
2. Pastikan Package UserManager sudah kita install pada Mikotik kita.
Mikrotik-v.6.6-HotSpot-with-User-Manager-IP-Public-002
3. Setelah kita melakukan konfigurasi Mikrotik HotSpot pada artikel sebelumnya, selanjutnya kita tinggal melakukan sedikit perubahan. Langsung saja ke menu IP HotSpot pada option Server Profiles. Buka profile yang telah kita buat lalu pada option RADIUS kita check mark pilihan Use Radius dan kita pilih NAS port type 15 (ethernet).
Mikrotik-v.6.6-HotSpot-with-User-Manager-IP-Public-003
4. Selanjutnya kita klik pada menu utama Winbox RADIUS, lalu tambah sebuah Radius Server dengan services : HotSpot, Login, Wireless. Pada address Radius Server kita isikan IP Public kita, misalnya : 36.74.199.209 dan isikan pula password-nya yang nanti akan kita entry pada Server Radius di konfigurasi User Manager. Selanjutnya pada menu INCOMING, kita checkmark Accept dengan port 3799 ( atau port yang kita kehendaki ).
Mikrotik-v.6.6-HotSpot-with-User-Manager-IP-Public-004
5. Selanjutnya sekarang kita Login pada Web Configuration Usermanager. Cara aksesnya adalah : IP-Mikrotik:port/userman . Username dan password default Usermanager adalah admin tanpa password.
Mikrotik-v.6.6-HotSpot-with-User-Manager-IP-Public-005
6. Selanjutnya pada menu Router, kita masukkan Nama Router ( bebas ), IP Radius Server ( IP Public ), Password Radius Server, serta Radius Incoming COA + Port 3799.
Mikrotik-v.6.6-HotSpot-with-User-Manager-IP-Public-006
7. Selanjutnya pada menu Customer, masukkan data User admin Userman dan password serta profile perusahaan kita.
Mikrotik-v.6.6-HotSpot-with-User-Manager-IP-Public-007
8. Selanjutnya pada menu Profiles, kita buat profile user dan profile limitations. Buatlan seperti contoh dibawah ini.
Mikrotik-v.6.6-HotSpot-with-User-Manager-IP-Public-008
9. Buat juga beberapa profile sesuai kebutuhan anda.
Mikrotik-v.6.6-HotSpot-with-User-Manager-IP-Public-009
10. Selanjutnya pada menu User, kita akan membuat user hotspot secara massal atau generate user. Buatlah seperti contoh dibawah ini.
Mikrotik-v.6.6-HotSpot-with-User-Manager-IP-Public-010
11. Okey, berikut ini tampilan user yang telah kita generate dan siap digunakan untuk login Hotspot.
Mikrotik-v.6.6-HotSpot-with-User-Manager-IP-Public-011
12. Selanjutnya kita akses internet, misalnya ke google.com maka akan muncul Login Page Mikrotik HotSpot kita. Lakukan Login dengan user yang telah dibuat tadi.
Mikrotik-v.6.6-HotSpot-with-User-Manager-IP-Public-012
13. Tarrrraaaaaa… Kita berhasil login dan akses internet via Mikrotik HotSpot dan Usermanager dari Radius Server Mirkotik.
Mikrotik-v.6.6-HotSpot-with-User-Manager-IP-Public-013
14. Perhatikan pada Mikrotik Winbox menu Active user. Disitu akan terlihat Status User yang sedang aktif Login via Mikrotik HotSpot. Perhatikan juga menu Queue akan terpantau pemakaian bandwith dari user HotSpot.
Mikrotik-v.6.6-HotSpot-with-User-Manager-IP-Public-014
15. Perhatikan juga menu Cookies juga terpantau sebagaimana Profile HotSpot Server yang telah kita buat, yaitu 30 menit. Artinya jika user ini tidak ada aktifitas akses internet ataupun Log off, lalu dia mengakses internet lagi maka tidak diperlukan Login Mikotik HotSpot karena session-nya masih aktif dalam waktu 30 menit ( sejak pertama Login & waktu berlanjut per-30 menit ).
Mikrotik-v.6.6-HotSpot-with-User-Manager-IP-Public-015
16. Okey, sekian dulu tutorial saya ini, semoga bermanfaat… Selamat berkarya dan berprestasi bersama XP Solution……….

Setting up a Mikrotik Hotspot with UserManager (Step-By-Step Tutorial)

Mikrotik RouterOS provides a very powerful Hotspot Feature. This can be used with the Mikrotik built in Radius server (Userman) or with a remote Radius/Freeradius Server.

You will need:

Mikrotik RouterBOARD:

  • Level 4 or better licence (Lower licences will allow only a single Hotspot client)
  • RouterOS 6.x (5.x will also work, but this tutorial is based on v6.7)
The network will be configured as below. You may need to adjust the IP Addresses to suit your needs
Mikrotik Hotspot Network


Notes:
The RouterBOARD CPU and RAM will directly affect the performance of your Hotspot, so consider beforehand how many clients you wish to connect.
A RouterBOARD 750 can comfortably run about 25-50 users.
In my example I will use a RouterBOARD 532 with one 2.4ghz WLAN card


Step 1: Configure internet access on the router


Add Router IP Address:
/ip address add address=10.0.0.2/24 interface=ether1
Change the IP to match your network configuration

  1. Click on the IP Menu
  2. Click on the Addresses Menu
  3. Click "+"
  4. Enter the IP Address you wish to assign to the router, this will be the outward facing IP, so make sure to select the ethernet interface that will give the router internet access.
  5. Click on "Apply"


Configure Upstream DNS Server:
/ip dns set servers=8.8.8.8 allow-remote-requests=yes
This example uses Google's DNS service. You can easily make use of OpenDNS to implement simple filtering, or use your own DNS servers if needed.

  1. Click on the IP Menu
  2. Click on the DNS Menu
  3. Enter your desired DNS server - here I am using Google's DNS
  4. Click on "Apply"


Configure Default Route:
/ip route add dst-address=0.0.0.0/0 gateway 10.0.0.1

  1. Click on IP
  2. Click on Routes
  3. Click on "+"
  4. Enter 0.0.0.0/0 as the Dst. Address
  5. Enter 10.0.0.1 as the Gateway

Test:
Check if you can ping a public ip address like 8.8.8.8

  1. Click on Tools
  2. Click on Ping
  3. Enter a publicly available address 
  4. Click Start 

Step 2: Install User Manager and Hotspot

If you plan to use a stand alone Radius Server, you may skip this step.
Download the firmware package from Mikrotik
Extract the zip file on your local drive
  1. Make sure that the version of the file matches the version and architecture of your device
  2. Open the Files window on winbox
  3. Drag the "user-manager-X.X-xxxxxx.npk" to the files window.
  4. Do the same for "hotspot-X.X-xxxxxx.npk".
  5. Reboot the router (/system reboot)

Step 3: Configure interfaces

First, we need to configure two Bridge interfaces. The first one will be a loopback interface. I have found in the past that if you use the normal loopback address (127.0.0.1), or one of the other static addresses, for the Radius (Usermanager) server, you may experience some difficulties.

3.1.1 - Create Loopback Bridge
/interface bridge add name=Loopback
  1. Click on the "Bridge" menu
  2. Click on "+"
  3. Enter "Loopback" for the bridge name
  4. Click "Apply"
3.1.2 - Add Loopback Bridge IP Address
I use any unused private ip range for this, it is used simply as an interface to run the RADIUS server on.
/ip address add address=10.10.0.1/32 interface=Loopback

  1. Click on the IP Menu
  2. Click on the Addresses menu
  3. Click the "+" button
  4. Enter "10.10.0.1/32" as the IP Address
  5. Select the "Loopback" Interface
  6. Click "OK"


3.2.1 - Create Hotspot Bridge
If you are planning to run the hotspot on a single interface you may skip this step.
/interface bridge add name=Hotspot
  1. Click on the "Bridge" menu
  2. Click on "+"
  3. Enter "Loopback" for the bridge name
  4. Click "Apply"
3.2.2 - Add Hotspot Bridge IP Address
I make use of the private 192.168.0.1/24 range for the hotspot network, but you can use whatever is suitable in your setup.
/ip address add address=192.168.0.1/24 interface=Hotspot


  1. Click on the IP Menu
  2. Click on the Addresses menu
  3. Click the "+" button
  4. Enter "192.168.0.1/24" as the IP Address
  5. Select the "Hotspot" Interface
  6. Click "OK"
3.2.3 - Add Hotspot Ports to Bridge
If you would like multiple interfaces to have access to the hotspot, you can repeat this process, only changing the interface each time.
If you are running on a RouterBOARD 750 or similar, you will need to add the ports that you AP's are connected to, to the bridge.
/interface bridge port add bridge=Hotspot interface=wlan1
  1. Click on the "Bridge" menu
  2. Click on the "Ports" Tab
  3. Click on the "+"
  4. Select the interface you want to add to the hotspot, in my case it is "wlan1"
  5. Select the "Hotspot" bridge
  6. Click "OK
3.3 - Configure the Access Point
If you are using a RouterBOARD 750 or similar, you will not be using this section.
You may choose to implement security on your access point, but since this is a captive portal, you should not need to use any security. This tutorial will not include any security settings.
/interface wireless set [ find default-name=wlan1 ] band=2ghz-b/g disabled=no mode=ap-bridge ssid=Hotspot
  1. Click on the "Wireless" Menu
  2. Double click on the Wireless Interface that you will be using
  3. Set the mode to "ap-bridge"
  4. Set the band to 2Ghz-B/G (or otherwise if needs be)
  5. Change the SSID to "Hotspot", or whatever suits you.
  6. Click "OK"

4 - Configure the Hotspot

/ip hotspot profile
add dns-name=hotspot.example.com hotspot-address=192.168.0.1 name=hsprof1 smtp-server=192.168.123.4
/ip hotspot
add address-pool=hs-pool-7 disabled=no interface=Hotspot name=hotspot1 profile=hsprof1
/ip hotspot user profile
set [ find default=yes ] idle-timeout=none keepalive-timeout=2m mac-cookie-timeout=3d
/ip hotspot user
add name=dexter password=dexter
  1. Click on the "IP" menu. If this option is not available refer to step 2
  2. Click on the "Hotspot" item
  3. Click on "Hotspot Setup". This will start the Hotspot Setup Wizard
4.1 - The Hotspot Wizard
  1. Select the Hotspot bridge as the Hotspot Interface
  2. Click Next
  1. Click next - The address range should be filled in automatically as per our network configuration.

  1. Click Next - the address pool should be pre-populated with the right settings

  1. This tutorial will not cover the use of Certificates, so you may select "none" and click next
  1. Enter the IP-Address of your SMTP server. Many providers do not allow use of their SMTP servers outside their own network, so this option allows you to circumvent the SMTP server configured on the client's device in favor of your own. (You may even specify the SMTP server of you own provider in some cases)
  2. Click "Next"

These are the upstream DNS servers used by the hotspot.
  1. Enter one or more upstream DNS servers, you can use OpenDNS to provide you with a basic filtering service. Here I use Google's public DNS.
  2. Click "Next"

  1. Enter a host name for the local Hotspot. I am using hotspot.example.com, but this could be anything you want.
  2. Click "Next"

  1. Enter a name for your administrative Hotspot user.
  2. Enter a password for your administrative user.
  3. Click "Next"

  1.  Click "OK" to complete your hotspot setup.


Congratulations, you have now set up basic functionality for a Mikrotik Wireless Hotspot, you can create users under "IP->Hotspot->Users. But alas, you still need to configure the Usermanager for a fully featured hotspot.

Step 5 - Configuring UserManager

5.1 Setting up the Hotspot to use RADIUS
  1. Click on the "IP" menu
  2. Click on "Hotspot"
  3. Select the "Server Profiles" tab
  4. Double click on "hsprof1"
  5. Select the "RADIUS" tab
  6. Tick the "Use RADIUS" tickbox
  7. Click "OK"

  1. Click on "RADIUS"
  2. Click on "+"
  3. Tick the "hotspot" tickbox
  4. Add the loopback bridge IP to the address field, in this tutorial 10.10.0.1
  5. Choose a secure password
  6. Click "OK"

  1. Using your browser of choice, connect to http://router-ip/userman
  2. Click "Log In" - The default username is admin with no password
  1. Once you have logged in, click on the "Routers" menu
  2. Click "Add" then "New"
  3. Enter "Local Router" as the name
  4. Enter the Loopback Bridge IP address
  5. Enter the password you chose earlier.
  6. Click "OK" 

Your Mikrotik Hotspot should now be able to communicate with the Usermanager Radius Server. You can now proceed to set up profiles and users on the user manager interface.

I will soon do a UserManager Tutorial as well.